

Wednesday, 23 November 2016
Saturday, 15 October 2016
Week 6
Dear Peanut,
Well, you must have been doing a whole lot of growing these part two days as Mama has been feeling absolutely rotten!
You've grown from a sesame seed to sweet pea, that might explain some of Mama's funny symptoms! You're making me mega thirsty which is a good thing - I never did drink enough water! And you've put me off tea and coffee - good going!
Mummy and Daddy are super excited because it's only 13 days until we get to see and hear you! We decided to book in an early scan, just so we can check you're cooking away okay in there! We've also got the midwife that week too - our first appointment! It's slowly starting to feel real now! Although no bump just yet, but lots of bloating in the evenings :)

Keep growing big and strong, little one xx
Well, you must have been doing a whole lot of growing these part two days as Mama has been feeling absolutely rotten!
You've grown from a sesame seed to sweet pea, that might explain some of Mama's funny symptoms! You're making me mega thirsty which is a good thing - I never did drink enough water! And you've put me off tea and coffee - good going!
Mummy and Daddy are super excited because it's only 13 days until we get to see and hear you! We decided to book in an early scan, just so we can check you're cooking away okay in there! We've also got the midwife that week too - our first appointment! It's slowly starting to feel real now! Although no bump just yet, but lots of bloating in the evenings :)
Keep growing big and strong, little one xx
Wednesday, 17 August 2016
3 year throwback!
This week marks 3 years since we moved into our home, and boy has a lot changed. Of all the space we have, only the hallway and large spare bedroom are still to be redecorated!
And ignoring the kitchen, everything else has been on a budget, not pushing the bank balance at all. I'm not a fan of labels and big interior brands - there are a few brands I use simply because I prefer them to their alternatives, such as Annie Sloane chalk paint, but for the most part, I have a preference for high street, affordable decor. After all, I believe a beautiful home is down to good styling, whatever the items you're using!
So to celebrate 3 years in this beautiful little home, I'm sharing some of the great tips, advice and ideas I've been given or have come to realise along the way!
1. Plan each room - try and stick to one theme to prevent an overload of styles in one space. Then stick to the theme! This will also stop you buying accessories just because you like them, if they don't fit the style. Mood boards are great for matching wallpaper, paint colours, lighting and accessories.
2. Throw away anything you don't or won't use - I was a hoarder, anything home decor related I couldn't throw because it was of value, or so I thought. Until I realised that entire wardrobe of random home pieces I would never use again was actually just a waste of storage. Bit by bit, the items because charity shop bargains, gifts to friends, and eBay junk. Decluttered house, decluttered mind :)
3. Get ideas and advice from people who have tried your ideas - Pinterest is your home decor Bible! Browse for ideas, keep a board for each room to keep track of your ideas, and then follow the links. I saw a great article about a woman who wallpapered her floor and decided then and there I would try it the next day - but I spent a good 2 hours googling techniques, as there were many different ones. Read people's experiences, to help decide which method will work for you.
4. Give each room a point - this is a tip I learned from a mortgage advisor. Whether or not you're going to sell your house one day, each room should be seen to have it's own use.
If you have a spare room, even if you never have people over to stay, set it up as a guest room. Dress the bed, theme the room neutral, and add little extras that add character to the room, such as this adorable wifi password frame.
5. Be brave with textures and patterns - if there's a floral, chevron, or patterned wallpaper you love, do it! We always hear that neutral is best, but that's mainly to sell a house, so if you're planning to stay a while, decorate for you. Be gentle with patterns; instead of papering every wall, have a feature wall, and then add pops of the same colours or patterns from the print around the room, such as framed prints, cushions, throws, curtains or drawer handles!
6. Don't test paint on the wall! - I learned this the hard way! Three beige stripes on the wall, which needed immense sanding, and still you can see their outline through the chosen top coat. Instead, a great idea from Charlotte at The Home That Made Me is to paint a large piece of cardboard or wood and take it around the room.
7. Add colour through accessories - if you're anything like me you'll want to change decor frequently as you see new items and styles in the magazines! One minute its all about pineapples, then pastels, then deer and lumberjack, then minimalist white. I can never keep up! But if you have a neutral basis, so walls and floor, you can change up the soft furnishings as often as you like, which leads us to...
8. Be seasonal! My favourite idea of all. In my spare bedroom, I have four boxes. Spring, Summer, Autumn and Winter. In each, they have my key items for bringing the season to the home. My spring box is unsurprisingly very yellow, with daffodils, yellow chevron cushion covers, and a grey and yellow throw. Winter, on the other hand, is very much red checkered, with throws, cushion covers, burlap bunting, and glittery stags. I buy one new decoration each year to add to the box, but try to reuse all the existing pieces each year for nostalgia and saving money!


Monday, 1 August 2016
Spice of life!
You guys know by now that I love a good Pinterest challenge!
When I was originally looking on the IKEA website for shelving a year or so ago, I randomly
came across the spice racks. Thinking they looked like perfect book shelves, I searched Pinterest to see if it had already been done.
Of course it had! I was swamped by blogs and posts and beautiful photos of spice rack hacks!
My first set of IKEA BEKVAM spice racks totally converted me. I painted them in Annie Sloane chalk paint, and distressed them then waxed.


We needed something small for the bathroom to hold our Mr and Mrs daily bits and pieces, that would fit under the mirror on a small wall. This time, I just varnished the wood to seal it from the condensation of the bathroom, but left them as bare wood. I was originally going to paint them white but everything in the room is white and grey, so the wood just helps break that up a bit and bring something a little different to the room. The bathroom is almost done now! The wooden beams and skirtings still need their top coat, we would love a new radiator and to knock out that cupboard, but really it's only the flooring we need doing most of all.

I'm already filling my basket for another IKEA order and no doubt, there will be more spice racks in there, waiting for their use! Love these little shelves, and maybe one day I'll actually get some to be use as spice racks!
Spice rack link: http://www.ikea.com/gb/en/catalog/products/40070185/
Wednesday, 29 June 2016
Blue skies to grey
I have a problem. I love painting, and more often or not, I get the urge at 6am which means I can't fall back to sleep. This morning was one of those mornings. Hubs' always finds it hilarious, because he will wake up mid-morning to a freshly painted room.
The last time this happened, I had been up all night with the dog who was having seizures, and I decided to use the time to paint the living room.
So last night we decided we didn't like the pale blue 'blue skies' colour we originally painted the bathroom, and we thought we needed something a little bolder and darker.
Months ago when we picked a grey for the office room, it was buy one get one free on Valspar. We decided we may as well grab the free one, as we'd need to paint other rooms eventually. I was pondering between a glitter grey or a standard grey, and remembered that giant tub of Valspar downstairs - that won.
Let's just go back slightly and remember what the bathroom looked like when we first moved in....you'll have to forgive me for the awful quality photos. I never really intended to share them hence the dark shadowed areas! But you'll get the idea. :)
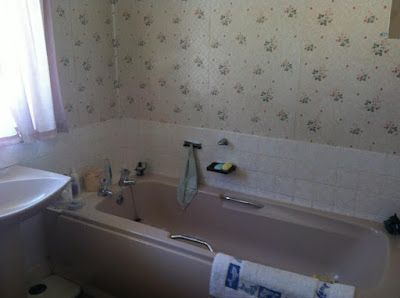

Yeah, floral...!
So when we had it re-plastered, we undercoated it and just picked a light blue thinking that's a good bathroom colour. Unfortunately, it was so white, that it just looked too bright for the room. Then, we had the white tiles put up and the walls looked just as white. It was far too overpowering.


I always start painting in a small patch to get a feel for the difference in colour. My tip is to start somewhere darker, out of direct sunlight, to get a good idea of the shade. Usually you'd go for a naturally light area, but in a room like a bathroom, it's never usually overly bright, and the darker shadowed areas give you a better indication.
Don't forget also that paint dries differently than it goes on, so bare in mind whats on the tub!


We recently had the glass attached to the shower, also, as we were dying to have more showers but didn't want to risk a soggy floor!
Now that's ready, we are on the hunt for a new flooring and the last few storage pieces. I really must get the mirrored door on that IKEA unit, too!
Thanks for all your advice and help picking colours and paints on Instagram!
Saira xo
The last time this happened, I had been up all night with the dog who was having seizures, and I decided to use the time to paint the living room.
So last night we decided we didn't like the pale blue 'blue skies' colour we originally painted the bathroom, and we thought we needed something a little bolder and darker.
Months ago when we picked a grey for the office room, it was buy one get one free on Valspar. We decided we may as well grab the free one, as we'd need to paint other rooms eventually. I was pondering between a glitter grey or a standard grey, and remembered that giant tub of Valspar downstairs - that won.
Let's just go back slightly and remember what the bathroom looked like when we first moved in....you'll have to forgive me for the awful quality photos. I never really intended to share them hence the dark shadowed areas! But you'll get the idea. :)


Yeah, floral...!
So when we had it re-plastered, we undercoated it and just picked a light blue thinking that's a good bathroom colour. Unfortunately, it was so white, that it just looked too bright for the room. Then, we had the white tiles put up and the walls looked just as white. It was far too overpowering.


I always start painting in a small patch to get a feel for the difference in colour. My tip is to start somewhere darker, out of direct sunlight, to get a good idea of the shade. Usually you'd go for a naturally light area, but in a room like a bathroom, it's never usually overly bright, and the darker shadowed areas give you a better indication.
Don't forget also that paint dries differently than it goes on, so bare in mind whats on the tub!


Now although Valspar tubs are designed with a handle grip to make for easy opening, it's not! I ended up spilling the tub over myself and having to throw out all my clothes. Go careful!
And here's the almost finished result.....

I love it! The grey is a lovely contrast from so much white.
The Valspar is so watery, that it goes on far easier than normal paint, and a little goes
an awfully long way! Be sure to use a roller for even coverage and to prevent drips.
The Valspar is so watery, that it goes on far easier than normal paint, and a little goes
an awfully long way! Be sure to use a roller for even coverage and to prevent drips.

We recently had the glass attached to the shower, also, as we were dying to have more showers but didn't want to risk a soggy floor!
Now that's ready, we are on the hunt for a new flooring and the last few storage pieces. I really must get the mirrored door on that IKEA unit, too!
Thanks for all your advice and help picking colours and paints on Instagram!
Saira xo
Saturday, 9 April 2016
Let's Talk About Shelves
Today I finally put up the shelves in the office, and then spent the good part of an hour dressing and re-dressing them. I'm picky when it comes to what's displayed on our walls!
I don't know about you, but I can't just throw any old things onto a shelf. Everything on my walls is carefully thought about, and re-positioned about 198238138 times before I am happy with it.
I wanted to share with you guys what I think is important to consider when attaching and dressing shelves.

__________________________________________
1. Consider what style of shelves you want.
Yes, there are hundreds of different shelf styles!
From picture ledges which are thin and light, to thick base shelves with inner tubing to attach to the wall, you'll be spoiled for choice.
Firstly, pick the style that suits what's going to be placed on it - you don't want a picture ledge shelf for plant pots, likewise you don't want a wide based shelf for small ornaments.
Once you've picked the style, start browsing. They'll have different colours, different attachment styles, etc, so be sure to read all the specs before you buy.
 Not all shelves are horizontal - I love these cloud shelves from Tiger!
2. Consider their positioning
Low or wide shelves are lethal for little heads, so if you're going for that style, make sure they're going up high!
If it's near a door, make sure it's not in the opening line
3. Consider their place in the room
There are a few things to consider here.
Lighting - if you have glass frames, you'll want to make sure they aren't too reflective, so pick either areas that are in the shade, or position them at an angle.
The view as you enter the room / from the bed / chair / etc - utilise the space, and decide who is going to get the most enjoyment from the look. Do you want to enjoy it in a room, or is it an eye-grabber as you pass by in a hallway or through a doorway.
4. Consider themes
This should be easy, as you generally put up frames to home something you already have. Kids room? Kitchen? Try and match the items on your shelves to other themes in the room.
5. Start collecting bits to go on it
Once you've decided on a theme, keep an eye out for matching items that would compliment what you already have.
6. Practice different layouts
The fun bit!
The best advice I can give you is to lay it out on the floor before you stick ANYTHING to the wall! Change it up and see what looks good where.
Look for inspiration!!! The best place is of course Pinterest! There are some great ideas of layouts. Imitation is flattery, so scribble down any ideas you love!
I like symmetry, but I also like to experiment with angular layouts - it all depends on what you're putting on your shelves as to what will look best.
7. AND....GO!
Hanging shelves shouldn't be hard.
You'll need a spirit level, pencil and electric drill, and of course the right sort of screws. We went to The Range and bought one of every £1 bag of screws and pins and put them in a selection container. It really does make the job easier!
With smaller shelves, draw around them on paper, mark out the holes, and use that as a guide to drill holes.
Once you've hung the shelves, start decorating.
Use every combination of layouts, and stand back and take a photo each time. Once you've tried all ideas, scroll through and I guarantee one will jump out at you! It did for me!
8. Commit!
Don't be surprised if you end up rummaging through old boxes / the attic / your parents garage, for that 'one thing' you know will make all the difference! And you'll start noticing things when you're shopping that will look nice. Commit to a theme and stick with it. My problem has always been that I get bored quickly, so this rule is saving me lots and lots of ££, and keeping me sane!
_________________________________________________________________-
The great thing about shelving is that you can change it up depending on it's use.
Here we have the same shelving dressed for a child's room, and then for an Arizona themed office space.


I don't know about you, but I can't just throw any old things onto a shelf. Everything on my walls is carefully thought about, and re-positioned about 198238138 times before I am happy with it.
I wanted to share with you guys what I think is important to consider when attaching and dressing shelves.

__________________________________________
1. Consider what style of shelves you want.
Yes, there are hundreds of different shelf styles!
From picture ledges which are thin and light, to thick base shelves with inner tubing to attach to the wall, you'll be spoiled for choice.
Firstly, pick the style that suits what's going to be placed on it - you don't want a picture ledge shelf for plant pots, likewise you don't want a wide based shelf for small ornaments.
Once you've picked the style, start browsing. They'll have different colours, different attachment styles, etc, so be sure to read all the specs before you buy.

2. Consider their positioning
Low or wide shelves are lethal for little heads, so if you're going for that style, make sure they're going up high!
If it's near a door, make sure it's not in the opening line
3. Consider their place in the room
There are a few things to consider here.
Lighting - if you have glass frames, you'll want to make sure they aren't too reflective, so pick either areas that are in the shade, or position them at an angle.
The view as you enter the room / from the bed / chair / etc - utilise the space, and decide who is going to get the most enjoyment from the look. Do you want to enjoy it in a room, or is it an eye-grabber as you pass by in a hallway or through a doorway.
4. Consider themes
This should be easy, as you generally put up frames to home something you already have. Kids room? Kitchen? Try and match the items on your shelves to other themes in the room.
5. Start collecting bits to go on it
Once you've decided on a theme, keep an eye out for matching items that would compliment what you already have.
6. Practice different layouts
The fun bit!
The best advice I can give you is to lay it out on the floor before you stick ANYTHING to the wall! Change it up and see what looks good where.
Look for inspiration!!! The best place is of course Pinterest! There are some great ideas of layouts. Imitation is flattery, so scribble down any ideas you love!
I like symmetry, but I also like to experiment with angular layouts - it all depends on what you're putting on your shelves as to what will look best.
7. AND....GO!
Hanging shelves shouldn't be hard.
You'll need a spirit level, pencil and electric drill, and of course the right sort of screws. We went to The Range and bought one of every £1 bag of screws and pins and put them in a selection container. It really does make the job easier!
With smaller shelves, draw around them on paper, mark out the holes, and use that as a guide to drill holes.
Once you've hung the shelves, start decorating.
Use every combination of layouts, and stand back and take a photo each time. Once you've tried all ideas, scroll through and I guarantee one will jump out at you! It did for me!
8. Commit!
Don't be surprised if you end up rummaging through old boxes / the attic / your parents garage, for that 'one thing' you know will make all the difference! And you'll start noticing things when you're shopping that will look nice. Commit to a theme and stick with it. My problem has always been that I get bored quickly, so this rule is saving me lots and lots of ££, and keeping me sane!
_________________________________________________________________-
The great thing about shelving is that you can change it up depending on it's use.
Here we have the same shelving dressed for a child's room, and then for an Arizona themed office space.


Sunday, 3 April 2016
Pimp your iPhone! Revisited.
Today we're revisiting an old post - the iPhone makeover!
You'll remember my pimp your iphone post from 2013.
It's a great way to make your iPhone more personal, and add a shabby, cute touch!
There are so many themes to choose from, though, that the possibilities are endless!
With spring here, it's nice to change it up!
Click here for the original post and tutorial! And don't forget to show me your creations, tag me on Instagram using the hashtag #pimpyouriphonesairanaomi or comment here!

Subscribe to:
Comments (Atom)