Saturday, 31 December 2016

Disneyland Paris | Dec 2016 | Pregnant in Disneyland

Hi all!

We just got back from a lovely time in Disneyland and I wanted to share our experience with you all to make your holidays a little easier, in any way I can.

I've headed each topic separately to make it easier to find what you're looking for, but some topics do overlap so if you're interested, stay and read through :)


Magic Breaks


We booked with MB because it was the cheapest option for the dates we wanted. Always shp around. We paid £1300 for 5 of us to stay for 5 days in Davy Crockett Ranch from Boxing Day 26th Dec - 30th Dec, not including any meals or transport.

You pay a 10% deposit to secure the booking then the remaining balance 60 days before you leave. All the documents are emailed to you 2 weeks before you go - print them all out, but get your own driving directions as theirs are very simplistic.

Driving to / in France

For us, it took 5 hours to get to Folkstone for the euro tunnel. We stopped once on the way but we didn't stop on the way back. The shorter leg of the journey was Calais to DCR, which took just short of 3 hours.

When driving in France, there are certain requirements - high vis jackets, breathalisers, high beam stickers, etc. You can purchase a whole France driving kit from Amazon or eBay for £20 max, which is what we did. We didn't need any of it so will be selling it on now, but it's a legal requirement so best to get one.

Driving is backwards in France - drive on the right, overtake on the left, and at roundabouts, give way to the right and drive around it to the right. They're big fans on undertaking foreign drivers we learned, but this was good because we found with their roads that the far right lane (slow lane) was either always full of lorries, or always turned into the next slip road or exit, so it was best to stay in the middle lane where possible. [Edit: I have received a bit of negativity around my choice to do this. However it was what I found safest with the uncertainty of the roads. Next time however I would know to expect this and most probably try not to have to stay in the middle lane.]

Take a Sat Nav! I pad £1.99 a day on O2 for the O2 travel bolt-on, so I could use my phone's sat nav in the car. We'd never have gotten there without it! There are three different routes you can take - we took the A26 to A4 route on the way to Disney, and the A26 to A1 route on the way home. The weather on the way home was appauling - so much fog, we had maybe 5m max visibility so we lowered our speed. Both ways were just as easy as each other. There are toll booths on the way, at the first one you get the ticket, and at the second one (a good couple of hours later) you put the ticket in and pay it. It was 21 euros both ways.


Euro Tunnel 

We booked this two weeks before we went. I was absolutely gutted - it turns out you can cash in your Tesco Clubcard vouchers for euro tunnel tickets, which I did (it covered the entire cost of £150!) but the euro tunnel wouldnt let me use them as I was booking within the next 14 days. I was so angry, this would have saved us £150, so if you have clubcard points to spend, get exchanging them online soon!


The tunnel is so easy to use, follow the signs and wait for your turn, follow more signs then board when ready.
Leave the car in 1st gear with the windows halfway down and enjoy the 35 minute ride!

You'll get a confirmation email when you book. All you need handy when there are passports and your booking number that you'll type into a machine.

On the way home, we got to Calais at 1pm, with tickets for a 5.30pm train. We asked to get an earlier one and were on board the 1.40pm, so always ask if you're early! They accomodate you automatically 2 hours each way.

Davy Crockett Ranch


The cabins are lovely and warm, lovely thick bedding which was needed in this freezing winter weather!
The cabins have small towels but definitely bring your own, as well as toilet roll as you'll have to buy more otherwise. You can get a cleaning pack from the reception for free.


The cabins have a microwave, hob and fridge freezer, as well as a kettle but no oven, so we recommend driving to Val D'Europe to get food supplies to cook as the shop only has a limited range. The roundabout and parking there is appalling so go early or late but not during rush hour!! (More about Val D'Europe below).

Our TV didn't work and took 3 days to be fixed, so if you have little ones I would bring an iPad or something as this kept ours entertained during dinner etc.

The drive to Disney is easy and signposted, sat nav tried to make us park in the Village but follow signs to 'Disney Parcs'. Take your parking pass each day to park at Disney for free. When you get to the first roundabout after DCR, there are two exits that say 'Disney Parcs' - take the second.

The pool at DCR is freezing - as a swim teacher I hoped they'd know more about air temperature! The room is huge and with snow outside, I couldn't believe it wasn't heated and they had fans on! Water was a cool 27 degrees, showers were cold and there's just two tiny hand dryers for warmth. We swam once but wouldn't do it again unless it was warmer in there. Again, take your own towel!
On site, there is a shop, evening restaurant, saloon bar, pool and reception which is open 24 hours, as well as public toilets, a play park and wooded walk area. It was too cold to use most of it for us, but the shop was handy for milk and extras. 
For 9 euros each, you can have a breakfast bag delivered to the trading post by your cabins in the morning to collect from 7am. It has nutella, jam, milk, coffee, tea, croissants, etc. We didn't, we just bought our own from the supermarket instead. 
If you're staying in a Disney Hotel / DCR, you can use magic hours! The park usually opens at 9am, sometimes 10am, and you get either one or two magic hours from 8am where the park is just open to hotel guests. This means there are no queues, and you can pretty much do 2/4 rides before everyone else piles in! 

Budgeting

Disney is as expensive as you make it. Magic Breaks gave us two vouchers, neither of which we used, as the prices were fine without the discount (and I forgot to bring it!). Eating anywhere is going to be more expensive that it should be, but there are cheaper options (see eating and drinking).

It took us a tank and a half to drive to Disney from Devon - thats £78 there, and the same back again with enough to drive to the park and back in between and have a quarter tank left when we got home.

The euro tunnel shops are expensive so try and take food in the car before you leave. We paid 22 euros for two Starbucks hot chocolates and two breakfast muffins, and a biscotti biscuit!!


Val D'Europe 

Again, use a Sat Nav. It took us around the back, but the front is clearly obvious - there are two arrows on a blue sign next to the huge VDE sign. The car park is a nightmare and I ended up going out and in a few times as the signage is poor. It's super busy. The supermarket part is on the ground floor so just go down the escalators and you'll see it in the middle of the building  - it's huge!

They have pregnancy and disability queues which I tried to use but didnt have a 'card' so wasn't allowed to, which was a shame as being pregnant, I couldn't stand to pack!
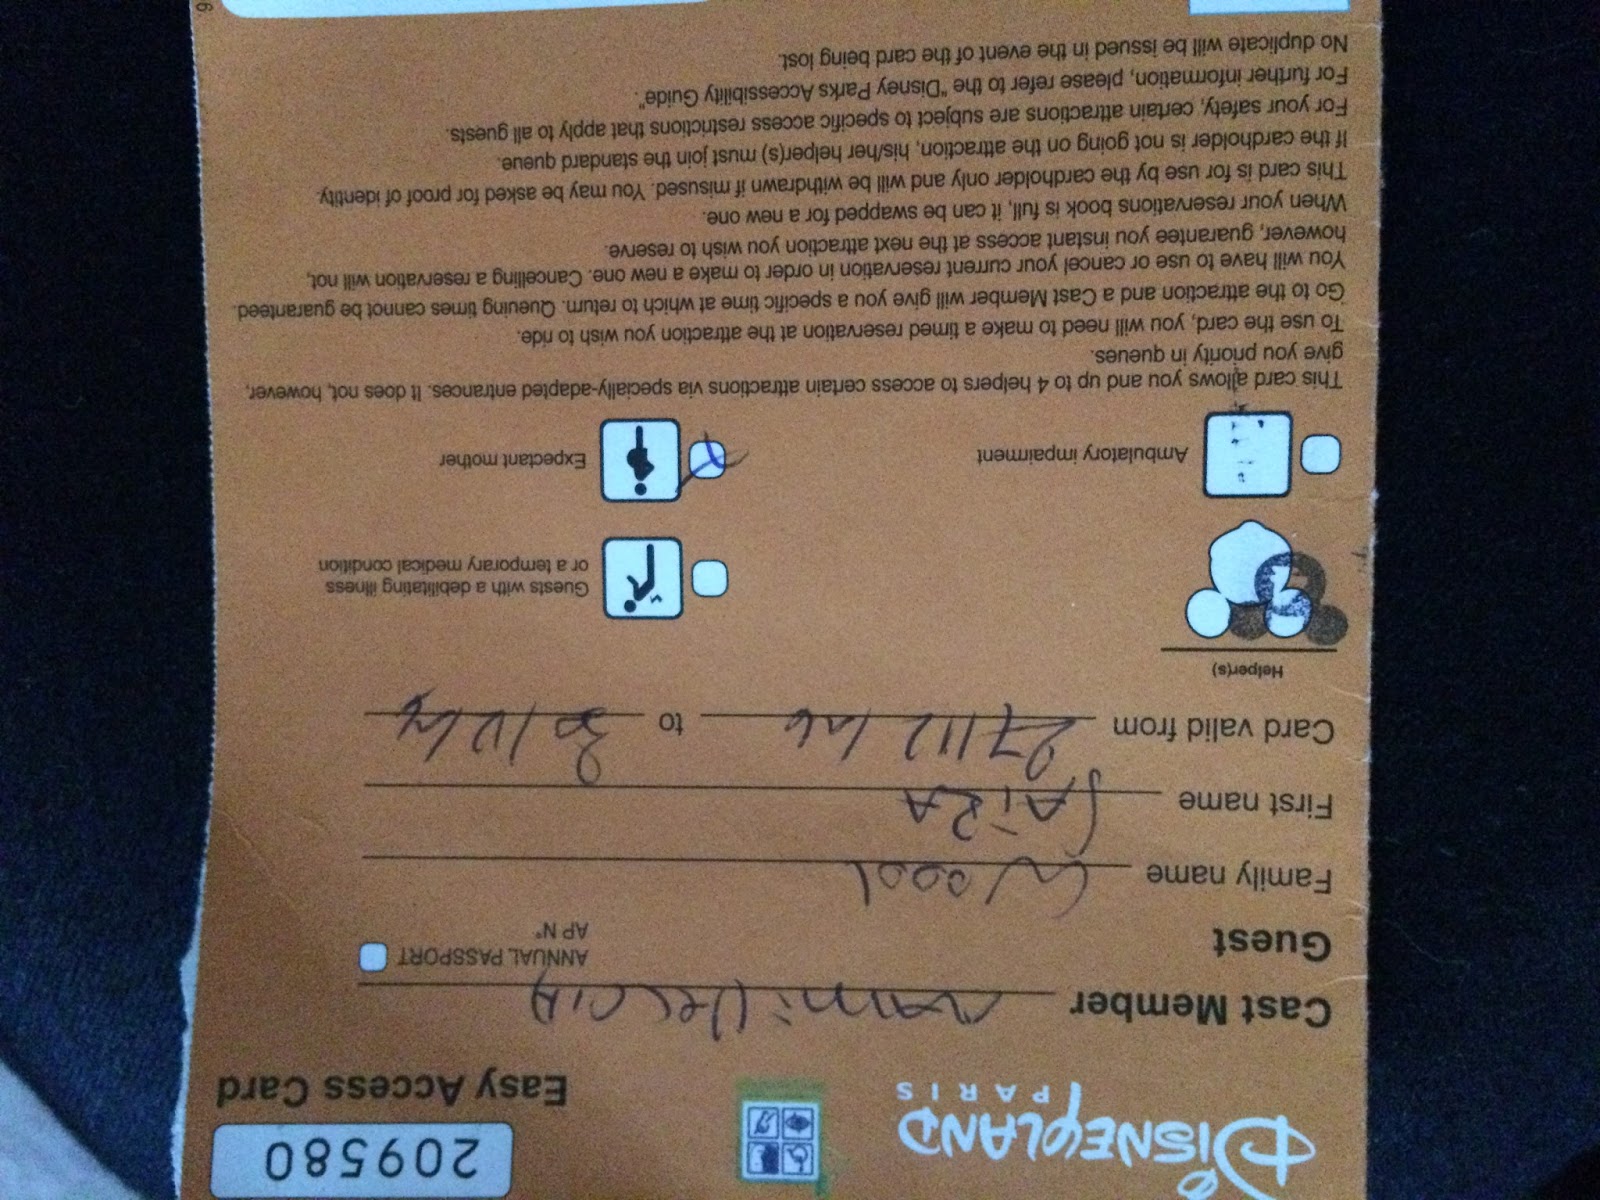
Easy Access Queuing

If you're disabled or pregnant, you are eligible for an easy access pass. Some people call them green passes and pink passes, but they're all orange and all the same!

The pass allows you and 4 helpers to access rides without queuing - the CM will give you a time to return (like fast pass) and you just come back.


Rides

Fast pass is your friend! Get one for bigger rides, then go do a shorter one whilst you wait. Make the most of single rider queues too, when available! 

Fast passes for Peter Pan and Crush's Coaster went quickly so grab those early!

If you're staying in a Disney Hotel / DCR, you can use magic hours! The park usually opens at 9am, sometimes 10am, and you get either one or two magic hours from 8am where the park is just open to hotel guests. This means there are no queues, and you can pretty much do 2/4 rides before everyone else piles in!

Eating and Drinking

Like I said, we had a kitchen. We bought food at VDE and cooked it at home. This was so cosy, and much nicer (and cheaper!) than eating out every day. We'd take rolls for lunch that we had made, and in the evenings we cooked soup, pasta, etc.
At lunchtime on two days, we did decide to eat in the park. Once in the cafe next to the Mad Hatter's Maze, and the second time in the Earl of Sandwich in the Disney Village. This second place was amazing, sandwiches were great, and good value for money. Also lots of seating unlike elsewhere.
We did wish that there were areas to eat your own food - you can't get a table in the Studios unless you're carrying a tray of food - the areas are guarded by women with ropes not allowing you past (same in the big food hall behind space mountain).

Any questions, please ask!


18 weeks!


Dear Bump,

Well I should probably start by apologising - this week we drove 10 hours to Disneyland Paris, with minimal breaks, and my body did NOT like it. I was limping for two days because I had such bad pains in my groin, but luckily since driving back again yesterday, I feel fine. I just hope you're okay in there and don't hold it against me! We did get you some adorable pressies though, I hope you like them!

I've had a couple of flutters in my tummy but nothing very strong, so we are still waiting patiently to feel you move for the first time! I hope its when your daddy's telling you a story before bed, because he always has his hands on you to keep you warm.

This week, according to my apps, you're around the size of an artichoke - 14.2cm and 19g! 
You've also started swallowing, yawning, hiccuping and sucking too :)

Symptoms? 
Everything's calmed down recently - I think the month off work was the best decision I could have made. I've been able to focus on getting back to full health and you definitely approve - I have a great appetite coming now, and your little bump is growing steadily! 
 I haven't put on any weight, but that's down to the sickness from last month, so no doubt you'll be helping me pile it on again soon ;)

You were so spoiled at Christmas! Your daddy got you some amazing and adorable gifts, all things Mummy was planning to buy (daddy did good!). Your Auntie Kerri and Mimi made you an amazing hamper, too! 

Only 17 days until we find out if you're a little Mr or Miss, and we could not be more excited!!!

Grow strong, little one. Mummy, Daddy and Scout love you so much. xxxx


Saturday, 15 October 2016

Week 6

Dear Peanut,

Well, you must have been doing a whole lot of growing these part two days as Mama has been feeling absolutely rotten!

You've grown from a sesame seed to sweet pea, that might explain some of Mama's funny symptoms! You're making me mega thirsty which is a good thing - I never did drink enough water! And you've put me off tea and coffee - good going!

Mummy and Daddy are super excited because it's only 13 days until we get to see and hear you! We decided to book in an early scan, just so we can check you're cooking away okay in there! We've also got the midwife that week too - our first appointment! It's slowly starting to feel real now! Although no bump just yet, but lots of bloating in the evenings :)


Keep growing big and strong, little one xx


Wednesday, 17 August 2016

3 year throwback!

This week marks 3 years since we moved into our home, and boy has a lot changed. Of all the space we have, only the hallway and large spare bedroom are still to be redecorated!
And ignoring the kitchen, everything else has been on a budget, not pushing the bank balance at all. I'm not a fan of labels and big interior brands - there are a few brands I use simply because I prefer them to their alternatives, such as Annie Sloane chalk paint, but for the most part, I have a preference for high street, affordable decor. After all, I believe a beautiful home is down to good styling, whatever the items you're using!

So to celebrate 3 years in this beautiful little home, I'm sharing some of the great tips, advice and ideas I've been given or have come to realise along the way!

1. Plan each room - try and stick to one theme to prevent an overload of styles in one space. Then stick to the theme! This will also stop you buying accessories just because you like them, if they don't fit the style. Mood boards are great for matching wallpaper, paint colours, lighting and accessories.

2. Throw away anything you don't or won't use - I was a hoarder, anything home decor related I couldn't throw because it was of value, or so I thought. Until I realised that entire wardrobe of random home pieces I would never use again was actually just a waste of storage. Bit by bit, the items because charity shop bargains, gifts to friends, and eBay junk. Decluttered house, decluttered mind :)
 
3. Get ideas and advice from people who have tried your ideas - Pinterest is your home decor Bible! Browse for ideas, keep a board for each room to keep track of your ideas, and then follow the links. I saw a great article about a woman who wallpapered her floor and decided then and there I would try it the next day - but I spent a good 2 hours googling techniques, as there were many different ones. Read people's experiences, to help decide which method will work for you.

4. Give each room a point - this is a tip I learned from a mortgage advisor. Whether or not you're  going to sell your house one day, each room should be seen to have it's own use.
If you have a spare room, even if you never have people over to stay, set it up as a guest room. Dress the bed, theme the room neutral, and add little extras that add character to the room, such as this adorable wifi password frame.

5. Be brave with textures and patterns - if there's a floral, chevron, or patterned wallpaper you love, do it! We always hear that neutral is best, but that's mainly to sell a house, so if you're planning to stay a while, decorate for you. Be gentle with patterns; instead of papering every wall, have a feature wall, and then add pops of the same colours or patterns from the print around the room, such as framed prints, cushions, throws, curtains or drawer handles!

6. Don't test paint on the wall! - I learned this the hard way! Three beige stripes on the wall, which needed immense sanding, and still you can see their outline through the chosen top coat. Instead, a great idea from Charlotte at The Home That Made Me is to paint a large piece of cardboard or wood and take it around the room.

7. Add colour through accessories - if you're anything like me you'll want to change decor frequently as you see new items and styles in the magazines! One minute its all about pineapples, then pastels, then deer and lumberjack, then minimalist white. I can never keep up! But if you have a neutral basis, so walls and floor, you can change up the soft furnishings as often as you like, which leads us to...

8. Be seasonal! My favourite idea of all. In my spare bedroom, I have four boxes. Spring, Summer, Autumn and Winter. In each, they have my key items for bringing the season to the home. My spring box is unsurprisingly very yellow, with daffodils, yellow chevron cushion covers, and a grey and yellow throw. Winter, on the other hand, is very much red checkered, with throws, cushion covers, burlap bunting, and glittery stags. I buy one new decoration each year to add to the box, but try to reuse all the existing pieces each year for nostalgia and saving money!


Monday, 1 August 2016

Spice of life!

You guys know by now that I love a good Pinterest challenge! 
When I was originally looking on the IKEA website for shelving a year or so ago, I randomly 
came across the spice racks. Thinking they looked like perfect book shelves, I searched Pinterest to see if it had already been done.
Of course it had! I was swamped by blogs and posts and beautiful photos of spice rack hacks!

My first set of IKEA BEKVAM spice racks totally converted me. I painted them in Annie Sloane chalk paint, and distressed them then waxed. 


They looked super once the room was finished, so not long after, I ordered some more for the bathroom. The spice racks are wider than normal ones but still dainty enough that they don't take up too much space.

We needed something small for the bathroom to hold our Mr and Mrs daily bits and pieces, that would fit under the mirror on a small wall. This time, I just varnished the wood to seal it from the condensation of the bathroom, but left them as bare wood. I was originally going to paint them white but everything in the room is white and grey, so the wood just helps break that up a bit and bring something a little different to the room. The bathroom is almost done now! The wooden beams and skirtings still need their top coat, we would love a new radiator and to knock out that cupboard, but really it's only the flooring we need doing most of all.


I'm already filling my basket for another IKEA order and no doubt, there will be more spice racks in there, waiting for their use! Love these little shelves, and maybe one day I'll actually get some to be use as spice racks!

Spice rack link: http://www.ikea.com/gb/en/catalog/products/40070185/

Wednesday, 29 June 2016

Blue skies to grey

I have a problem. I love painting, and more often or not, I get the urge at 6am which means I can't fall back to sleep. This morning was one of those mornings. Hubs' always finds it hilarious, because he will wake up mid-morning to a freshly painted room.
The last time this happened, I had been up all night with the dog who was having seizures, and I decided to use the time to paint the living room.

So last night we decided we didn't like the pale blue 'blue skies' colour we originally painted the bathroom, and we thought we needed something a little bolder and darker.

Months ago when we picked a grey for the office room, it was buy one get one free on Valspar. We decided we may as well grab the free one, as we'd need to paint other rooms eventually. I was pondering between a glitter grey or a standard grey, and remembered that giant tub of Valspar downstairs - that won.

Let's just go back slightly and remember what the bathroom looked like when we first moved in....you'll have to forgive me for the awful quality photos. I never really intended to share them hence the dark shadowed areas! But you'll get the idea. :)


Yeah, floral...!
So when we had it re-plastered, we undercoated it and just picked a light blue thinking that's a good bathroom colour. Unfortunately, it was so white, that it just looked too bright for the room. Then, we had the white tiles put up and the walls looked just as white. It was far too overpowering.


I always start painting in a small patch to get a feel for the difference in colour. My tip is to start somewhere darker, out of direct sunlight, to get a good idea of the shade. Usually you'd go for a naturally light area, but in a room like a bathroom, it's never usually overly bright, and the darker shadowed areas give you a better indication.
Don't forget also that paint dries differently than it goes on, so bare in mind whats on the tub!


Now although Valspar tubs are designed with a handle grip to make for easy opening, it's not! I ended up spilling the tub over myself and having to throw out all my clothes. Go careful!

 
And here's the almost finished result.....


I love it! The grey is a lovely contrast from so much white.
The Valspar is so watery, that it goes on far easier than normal paint, and a little goes
an awfully long way! Be sure to use a roller for even coverage and to prevent drips.


We recently had the glass attached to the shower, also, as we were dying to have more showers but didn't want to risk a soggy floor!
Now that's ready, we are on the hunt for a new flooring and the last few storage pieces. I really must get the mirrored door on that IKEA unit, too!

Thanks for all your advice and help picking colours and paints on Instagram!


Saira xo